November 9, 2010

Where was I?

Basically, life has been crazy. My laptop and a bottle of nail polish remover had a fight, and the nail polish remover won in the end. sad sad day. But the good news is that I'm back with tons to share! 
Fall seems like it came and went in a matter of two weeks since the leaves are already gone, but it was still so beautiful while it lasted. Here's some pictures of what fall looks like for me.

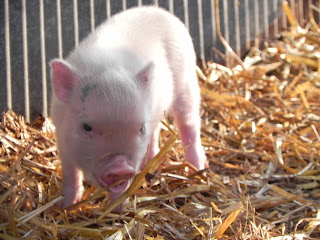
          These baby pigs were at another orchard I went to this fall, and they stole my heart from the very first second I lied eyes on them. Too, too precious! 


 My house and road is another place that transforms to become even more breath taking once the leaves change and the sun shines.


 My college campus becomes absolutely beautiful in the fall. Every time I walk by I'm stunned all over again by how drastic nature can really change in such a short time. If only the leaves stayed longer, for they're already gone, and winter seems to be here all too soon.


October 12, 2010

lets intertwined

Braids, braids, braids- oh wait, more braids. I love 'em, there are so many styles and looks you can accomplish by just twirling your hair here and there. The picture below is not of me, but I have done this on myself, and it looks pretty awesome. The other pictures are done by myself. They're all super easy yet look sophisticated and difficult.


So easy it's unbelievable. Not to mention once you learn how to do it, the options for variations are endless. I'll be adding posts on how to do various types of braids soon. stay tuned xx

October 11, 2010

apple madness

Kapnick Orchard's is a tradition for me here. Every fall I go and have a wonderful time, making the welcoming of fall even better. Friendly people, the smell of freshly made pumpkin spice donuts, the taste of apple butter that you can watch be brewed for you, hundreds -and i mean hundreds -of apple trees of every kind waiting for your hand to pick off them, corn mazes, tractor rides, and a pumpkin patch makes this the place to be in fall. This year we got just a litttttle obsessive with the apple picking, ending up with two whopping bushels worth of all different kinds of apples.

My Mother (above) and I walked past what seemed like every apple tree, picking and eating a couple here and there to see which were best. I swear I got my entire day's worth of calories just from all of the apples I consumed, it was just too fun to not participate in.

The beauty of fall never seems to disappoint me, rather it continues to amaze me. Rows of apple trees remind me of the album 'Apple Tree' by Katie Herzig, but more so the song 'wish you well' on the album. It's sad but somehow always manages to make me feel warm insnide. 'shovel' is another great song from that album. I intend my next post to be a music update too, so keep a lookout for it.

 Other than scuffin' up my boots a little and giving my arms a work out, the result of our trip to Kapnick Orchard was this, four giant bags of apples. Why do we need so many apples, you ask? Beats me, but we're gunna eat an apple a day to, well you know the saying. We're also gunna bake our little hearts out to make sure we use 'em all up- which leads me to the point of this post....

Warm Cinnamon Apple Muffins

Basically, deliciousness. The sour cream in these amazing muffins make them somewhat moist, unlike most muffins that are dry and crumbly. It's hard to decide what's best about these, the sugar cinnamon topping or the little surprise chunks of apple once you take a bite. But beware, you'll want to eat the whole thing (and probably another).


Ingredients:
2 cups all-purpose flour
1 cup sugar
3 teaspoons baking powder
1 1/4 teaspoons ground cinnamon
1/2 teaspoon baking soda
1/2 teaspoon salt
2 eggs
1 cup sour cream
1/4 cup butter or margarine, melted
1 1/2 cups chopped, peeled tart apples
(this recipe makes about 12-15 muffins)
This recipe is from The Comfort of Cooking.

Enjoy!


Topping:
1/4 cup sugar
3 tablespoons all-purpose flour
1/4 teaspoon ground cinnamon
2 tablespoons cold butter or margarine

Directions:
Preheat oven to 400 degrees.
In a large bowl, combine dry ingredients. In another bowl, beat the eggs, sour cream and butter. Stir into dry ingredients just until moistened. Fold in apples.
Spray paper muffin cups with nonstick cooking spray and fill cups to the top.
For topping, combine sugar, flour and cinnamon. Cut in butter until mixture resembles coarse crumbs. Sprinkle a rounded teaspoonful over each muffin.
Bake for 20-23 minutes, or until a toothpick comes out clean. Cool for 5 minutes before removing from pans to wire racks. Best if served warm.
To store: Place in an airtight container in the refrigerator. Reheat one muffin in the microwave for 10-15 seconds, if preferred warm.

October 1, 2010

surf's up

Here I am in a strange hotel room in Cincinnati. I'm here with my college soccer team for the weekend, kicking ass and eating enough for, well, a ravenous soccer team. I've been busy busy busy with school, but have been making little things here and there.
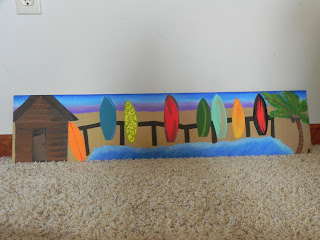
This is a painting I did for a good friend of mine's son. She was decorating his room with a surf theme.


September 6, 2010

just around the corner

I can practically hear Fall calling my name it's so close (thankfully!) This summer has been so hot and sticky the change in temperature will be anything but resisted. Boots, crisp apples, scarves, pumpkin spice, orchards, scenery, warm tea...every last one of those make me anticipate the fall season even more! I can't wait to post pictures of how beautiful it gets here once the leaves change and of all the fun accessories one can wear in the cooler months. Here are a couple pictures of my visit home for labor day weekend, giving you a taste of what it's like to live in the middle of nowhere.


my backyard is a mystical place...

 A trip home on labor day weekend allowed for some much needed fresh air, a greeting from our pig Lily, a nice cup of pumpkin spice tea, and a beautiful walk with my dogs. 3-day weekends are the best.

August 18, 2010

Recent Paintings

I've been getting requests from family and friends to post what I've been painting lately, so here's a little taste.


This was a box I painted for someone very close to me, the top has quotes on it, but I particularly liked the side's design.

This was my first oil painting. I remember doing it at 2 a.m on a night when I couldn't sleep. It took me roughly 3 hours.

I love the backround color mixture on this one...Welcome to dreamland.
This is actually a hard book cover that I reused after using the book for my book art collection, which I will be posting about soon. This is one of four that will be going in a good friend of mine's bathroom. The next picture will show another cover in the set, and the following photo is the set all together.


These have all been done within the last two weeks (except the first), so they are all fairly new. I'm hoping my next post will be about the book art that has completely consumed my room, it's very easy to do and looks really great so I'm excited to share that.

-Abby

It's just the beginning!

Here it is, my first post! I'm so excited to share some of the projects I do for my friends and family to see, along with whomever else cares to know. I'm not sure where I want to start, but I suppose I'll begin with my most recent diy project. It's extremely easy and takes almost no time at all!

Fabric Pom Pom's

What you'll need:

-old fabric
-scissors
-needle
-thread
-headband (optional)

What to do:

1. You'll need some small circular object that will allow you to trace a circle onto your fabric. You need a minimum of 6 circles (I usually use 7-8) to make one pom pom.


2. Cut out the Circles you've traced on the fabric.


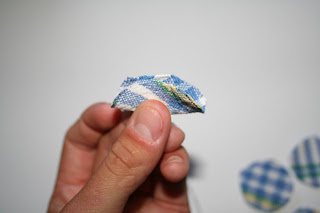
3. Now, fold one of the fabric circles in half, and fold it in half once again. It will be small, which is okay. Take your needle and thread and sew into the top of your fabric (at the creased point). Push it to the end of your string, and do the same for the rest of the fabric circles. Once you have them all assembled on the thread you should be able to just tie a tight knot where your last fabric piece is so it bunches the pieces together. Personally, I like to make another stitch from the first piece to the last to ensure it's bunched enough, but you don't have to do this. Once finished, cut off the excess string.


4. You should have a nice, small fabric pom pom. You may attach a pin to it if you want to wear the pom pom's on clothing or anything else. Underneath is a photo of a headband I made by supergluing multiple pom pom's onto a plain headband. It's fairly easy to make adornments to clothing or other accessories with these little flowers, so be creative with 'em! 
- Abby